Tag Archives: restoration

Century_Redds_Park-5491

1961 Century Coronado “Return of the Century”

This project started with a customer who came to Redd’s Pond looking for a Century Coronado like one he remembered from his teens. We scoured the internet for a months looking for candidates and ultimately found this one about 45 mins from our shop. we set up a visit, and found that it was a perfect restoration candidate.

DSC06842 sm

What we found is a  1961 Century Coronado with a restoration initiated 20 years ago, but never finished. While the previous owners did a great job tracking down almost every bit of chrome hardware and engine part almost all the woodworking remained.  Some structural work had been done in the stem and topsides frames, but otherwise most of the boat needed replacement.

I usually start a project like this documenting where everything I take off goes to guide reassembly, but in this case I had to start by trying to re-assemble the interior first to get an idea of what the interior looked like and to see if anything was missing.

engine box looking forward. The forwad bench and windsheild were only dropped in for a second
engine box looking forward. The forward bench and windshield were only dropped in for a second
looking aft from the middle bench. - Some upholstry remained, but would all be replaced.
looking aft from the middle bench. – Some upholstery remained, but would all be replaced.

From there I removed all of the interior I could and built a series of internal molds to retain the hull’s shape during the restoration and support it while upside down. We then rolled the hull over to remove the bottom planking.

Interior molds and legs built to hold boat in shape while bottom is removed and replaced. lifting and flipping jig assembled around it so I could flip it in place.

The old bottom planks were removed and saved for templates as well as the keel while half the bottom frames (every other one so the hull stayed together and kept it’s shape).

The old battens had some wiggles which I wanted to straighten out, so the original locations were marked, but not cut untill I could establish fair lines.
half the new frames dry fit before priming with the new keel in place to keep them centered.

Once the first half of the frames were replaced and fastened to the chines and topsides the other half of the frames were removed and replaced. The new keel was bolted down, then new plank battens fabricated and set into notches cut to match re-faired plank lines .

The Transom bow had been replace in the previous restoration work, but we re-established symmetry and adjusted the batten placement.
The Transom bow had been replaced in the previous restoration work, but we re-established symmetry and adjusted the batten placement.
All parts snaded and primed before assembly to keep the bilge cleaner, and give all structural parts a better fight against rot in the future.
All parts were sanded and primed before assembly to keep the bilge cleaner, and give all structural parts better resistance to rot in the future.
All new frames installed and back primed with original century colored bilge paint. Batten faired and dry fit before back priming and bedding.

This was a great opportunity to double check fairness of the plank lines as well as the bottom of the hull. we made sure to double check symmetry, and a little fairing at the transom to help the hull get up on a plane as well as general smoothness.


Next came bottom planking. Since we had almost all the original planks we had general templates to rough out the planking stock. We were able to get some 1 1/2″ thick mahogany stock that allowed us to  make pairs of planks from a single board sawn down the middle, which not only saved time, but led to a lot less wasted material going into the trash.

Our bandsaw took a little tuning to be up to this task, but once it was dialed in, we were able to easily re-saw the 8-12" wide stock allowing us to sometimes place multiple plank pairs on a single board. Rollers leading to and from the saw allowed this to be a one person job.
Our bandsaw took a little tuning to be up to this task, but once it was dialed in, I was able to easily re-saw the 8-12″ wide stock allowing us to place multiple plank pairs on a single board. Rollers leading to and from the saw allowed this to be a one person job.

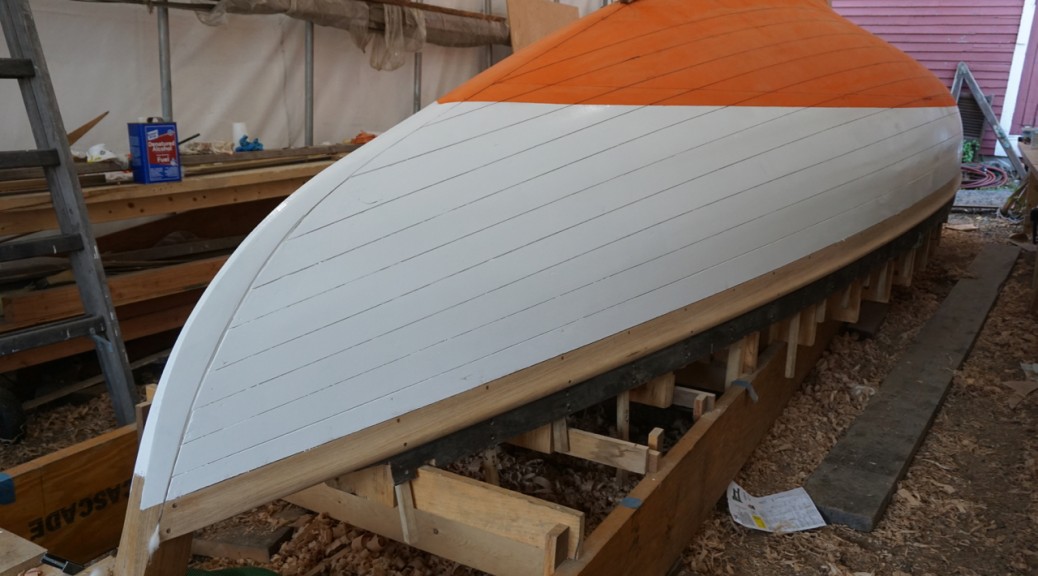
Once the bottom planks were made up and fit tight, we shaved a little of each edge, sanded, sealed the insides with Smith’s CPES and Century red bilge paint and then set all the planks in 5200 marine adhesive before fastening down. The small gaps and flexible glue allow the bottom to swell when soaked without applying too much pressure to the chines and pushing them out, while also having a rubber-gasket seal between every plank even when it has been out of the water and dried out for months. The bottom was then faired and sanded smooth with all screws set low enough to have a putty or wooden bung cover depdending on if it would be painted or varnished.


midway through bottom planking. plastic tubes were used to steam planks prior to being bent into place.
Midway through bottom planking. plastic tubes were used as steam boxes to steam planks prior to being bent into place.
Bottom planking installed prior to removal for back priming. I used as few fasteners as I could so the final instalation were as clean as possible, especially where they would be varnished.
Bottom planking installed prior to removal for back priming. I used as few fasteners as I could so the final installation was as clean as possible, especially at the bow where the ends of the planks would be varnished.

The topsides planks that were still on the boat were then removed as well for templating and the topsides and transom frames were inspected and repaired or replaced as necessary. The battens and the topsides planks were replaced again with re-sawn 6/4 stock being sure to prioritize  quarter-sawn stock to ensure stability as well as aesthetics.

topsides planks steamed in for a few days ahead while I fit the other planks and fasten them helps cut down on lost time. A day or two clamped leads to less stress when fitting and fastening.
Topsides planks steam bent in place and left clamped for a few days ahead while I fit the other planks and fasten them. This helps cut down on lost time. A day or two clamped into the curve leads to less stress when fitting and fastening.
Topsides aft planks left long to be trimmed when applying the transom planks to the stern.
The transom planks were last as Century applied the transom to the cover the ends of the side planks. The upper transom frame was replace as we found that it had been previously replaced and didn't have the correct radius adn was starting to rot on the ends.
The transom planks were last as Century applied the transom to the cover the ends of the side planks. The upper transom frame was replaced as we found that it had been previously replaced with incorrect radius and was starting to rot on the ends.
The transom planking complete.
Once topsides planking was done, rough fairing started and any screws too close to the surface were re-set.
Once fairing was getting close to done bungs are set in and trimmed for final fairing.
Final fairing before bottom paint. the bottom screws just receive a putty bung as they won't be visable.
Final fairing before bottom paint. the bottom planks’  screws receive a putty bung as they won’t be visible.

With the planking all completed, below the waterline was again faired, and the waterline marked off. Then a 2 day soak under a thin plastic sheet helped raise the kiln dried wood to a suitable moisture content before being sealed with CPES and covered in copper bronze bottom paint. The boat was then flipped before final sanding of the topsides to re-fit the deck before staining and varnish.

Water under the plastic helps soak the kild dried mahogany a bit to a better moisture content before the outter surface gets it's sealer coats.
Water under the plastic helps soak the kild dried mahogany to a better moisture content before the outer surface is sealed.
Before sealing I aligned the shaft strut and bored through the keel so the bore could be sealed and painted with the rest of the bottom.
Before sealing I aligned the shaft strut and bored through the keel so the bore could be sealed and painted with the rest of the bottom. The temporary block glued to the keel helps guide the start of the cut and prevent blow-out on the edge of the hole. There is a corresponding block on the inside of the hull for the same reason.
I didn't quite get the camera lined up, but you can just make out the cross hairs I was aiming for through the bore.
I didn’t quite get the camera lined up, but you can just make out the cross hairs I was aiming for through the bore.


The waterline was scribed on the boat based on the original planking and the bottom painted with InterProtect  and copper bronze bottom paint before setting up the flipping jig and getting her back upright.

While I reused as much of the deck as I could, I ended up replacing the aft deck and a lot of the foredeck due to rot.  With these parts fit, fastened and bunged, I finish sanded all bare wood, stained and varnished 12 coats. While a lot of the topsides and deck would end up painted white with the jet design it was much faster to varnish the whole boat than to try to work around all the curves and edges of the jet and keep them crisp.

Once flipped the old deck was laid out to make sure everything still fit before moving on to make it new.
Once flipped, the old deck was laid out to make sure everything still fit before moving on to make it new.
New aft deck and covering board fit and bored for some hardware. Most of this deck was able to come from a single board and has great color consistency.
New aft deck and covering board being  fit and bored for some hardware.
Here the deck is final sanded with seams routed in for putty and bungs faired down. The color difference between the side deck and new wood will be lessened by stain, but ultimatly hidden by white paint.
Here, the deck is final sanded with seams routed in for putty and bungs faired down. The color difference between the side deck and new wood will be lessened by stain, but ultimately hidden by white paint.
Our shop dog Jasper helping identify any rough spots left after fairing before stain was applied.
Stain starts to even up the color, but blends the new wood together nicely.
bow planks after stain.
Bow planks after stain.
The gloss builds quickly after a couple coats of primer epoxy and a couple coats of varnish.
Bow getting glossy
Bow getting glossy
But after about 10 coats I start checking my reflection.
After about 10 coats I start checking my reflection.

IMG_9257

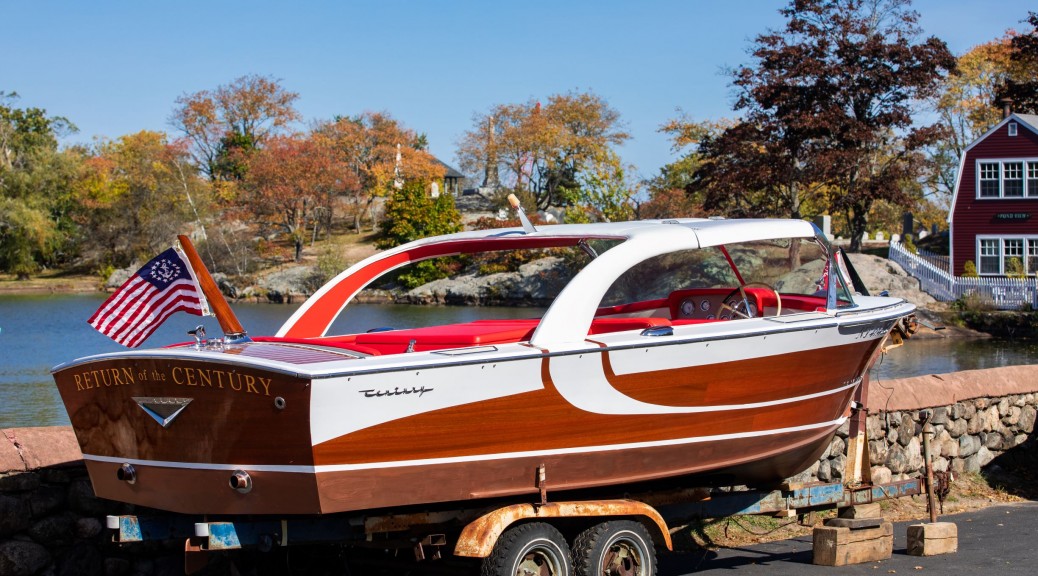
Once the varnish was built up I worked with a local sign painter to re-develop the shapes for the white paint as well as have the name of the boat lettered in gold leaf on the transom. She pinstriped the outlines on the hull so I could come back and brush more liberally in order to get a really flat coat. 5 coats of varnish were applied on top of the transom lettering to protect it for seasons to come.

with the Jet and other white outlined I painted through with glossy white.
With the Jet and other white outlined I painted through with glossy white.
looks much crisper with the tape off! None of the original paint outline was left on the planks, so she had to work from a bunch of pictures off the internet and shape as best she could.
Looks much crisper with the tape off! None of the original paint outline was left on the planks, so she had to work from a bunch of pictures off the internet and shape as well as she could.
The name is gold leaf with boarder and shadow.

With the hull complete, attention was turned to the interior. The engine box had deteriorated as well as the fore-deck so they were replaced, some of the controls and hardware had been acquired by the previous owner so they were cleaned, reassembled and chromed. Other missing or broken parts were remade and chromed as well. All the benches and side paneling were in good shape and were just cleaned up for being re-covered with vinyl.

We had the original engine box, so this one was fabricated to match.
The original engine box was used to template the new one with marine plywood and fresh oak corners.
The original foredeck was replaced with new marine plywood and mahogany off cuts from the planking
The original foredeck was replaced with new marine plywood and mahogany off cuts from the planking.


The original dash and cowl around the gauges are fiberglass molded peices that are later wraped in matting and vinyl.
The original dash and cowl around the gauges are fiberglass molded pieces that are later wrapped in matting and vinyl.
Deck hardware and cutwater fastened on.


The boat was then fully reassembled with all hardware and hard top and sent off to an upholstry shop to install the vinyl kit made from the original factory templates.

The vinyl was re-made to original templates in a kit and installed by local upholstery group.

Forward dash with vinyl installed.
Engine box with vinyl installed.
Boat on jacks to get on moving truck to come back to shop for systems installation.
Boat on jacks to get on moving truck to come back to Redd’s Pond shop for systems installation.


The engine was re-assembled, painted and test run by a local mechanic and finally the boat was re-wired with modern safety components such a main battery switch, a bilge blower and updated wiring.

327 Grey Marine Fireball V8 after re-build
Benches cleared out so the electrician could re-wire the boat and plumb fuel/exhaust.


Once the engine was test run and tuned and all wiring installed and tested, I invited a local friend to come take photos of the boat while we waited for a transportation company to truck it out to her new home in western New York.

This slideshow requires JavaScript.

The boat is currently being stored for the winter awaiting summer commissioning. Check back for photos and videos of it running in the lake.

The first coats of primer are applied while the boat is upside down and more accessible.

Herreshoff S-class Arete #2

Dry fit mast staves to test joints and geometry. the 5 staves are glued up as one, then internal blocking fit adn finally the last three staves glued on top.
Fairing out the curve of the mast in preparation for glue up.
The upper deadwood is dry fit to the oak backer roughed opt to width to be final faired on the boat
without a 30' steam box the keel was steamed in a bag with steam generators piped in from both ends.
without a 30′ steam box the keel was steamed in a bag with steam generators piped in from both ends.
without a 30' steam box the keel was steamed in a bag with steam generators piped in from both ends.
without a 30′ steam box the keel was steamed in a bag with steam generators piped in from both ends.
without a 30' steam box the keel was steamed in a bag with steam generators piped in from both ends.
without a 30′ steam box the keel was steamed in a bag with steam generators piped in from both ends.
without a 30' steam box the keel was steamed in a bag with steam generators piped in from both ends.
without a 30′ steam box the keel was steamed in a bag with steam generators piped in from both ends.
Once clamed to position the bag is removed to allow the keel to cool and maintain the shape.

keel clamped down

All the clamps in the shop were used to get the mast glued up

mast glue up

Here the backbone assembly has been bolted together and the garboard installed. the battens define plank lines as I go down the hull. Since the boat is being rebuilt over molds I was able to template one side for planks on both sides. Heere the transom frame is also installed but left tall to be finished when installing the deck.
Here the forward section of keel and stem are bolted together and the garboard installed.
planking continues from the keel down until the planks run full length to the transom. At that point the sheer plank is installed and planking is completed from the bottom up as well to improve efficiency.
At this point the old planks are removed so we can continue to check fair of the frames that dont have molds.
the shape of the molded sheer profile is roughed out with a radial arm saw on an angle and a quarter round router bit on the top.
Sheer plank installed and starting to plank in both directions. Planks are let to run long past the transom and will be trimmed to fit the transom plank later. All surfaced between planks and frames are back primed to help preserve the wood and lower planks are bedded to keep water out from between the surfaces.

Planking continues

each plank is roughed to final thickness on the corners so when fairing we don't remove too little or too much material. The internal surfaces are shaped sanded and painted, but the outer are left mostly rough to be faired once the whole shape is developed.
each plank is roughed to final thickness on the corners so when fairing we don’t remove too little or too much material. The internal surfaces are shaped sanded and painted, but the outer are left mostly rough to be faired once the whole shape is developed.

DSC05768

the final plank is called the shutter plank. the mast can be seen glued up and hanging on the side of the tent.
the last plank is hard to clamp, so I used small boards tied off to the structure of the building jig and wedges to push the plank in as the fit was finalized and the plank fastened in. Any imperfections in the planking wer fixed at this point brefore fairing.
I made a transom template of the inner and outter faces fo the transom to trim the aft ends of the planking so it fit well before bringing in the solid 3/4" white oak transom planks.
I made a transom template of the inner and outter faces fo the transom to trim the aft ends of the planking so it fit well before bringing in the solid 3/4″ white oak transom planks.
Here the fit is getting close, some gap can still be seen near the sheer to the left.
Fairing the hull with a stiff long sanding board. Initially the hull is rough planed, then sanded smooth.
Once sanded fair the screws are all sunk to a final depth and bunged over.

DSC06254 bow bungs DSC06275

Once the bungs are trimmed off and sanded smooth I scribed in a waterline and drove cotton caulking into the seams.


Here the transom planks are being developed from the lofting. This drawing shows the internal framing and planking shapes.
Planks are quick to fit against the templates, but important to get good tight seams for a nice varnished surface later. Each seam is backed by a 3/4" oak cleat
Planks are quick to fit against the templates, but important to get good tight seams for a nice varnished surface later. Each seam is backed by a 3/4″ oak cleat

DSC06291 DSC06292

All the time fitting the template and lofting the curved raked transom pays off when you have a nice even steam defining the edge of the well radiused transom plank.
The first coats of primer are applied while the boat is upside down and more accessible.

DSC06312 DSC06316

this insert ended up threaded a little deep as the original bolt broke and needed to be bored out and the top of the hole ended up without nice clean full threads.
Here the threaded inseret is seen not quite at full depth. The top of the inseert ends up almost a full rodation below the top surface.
the magnetic drill is set on a scrap steel plate and clamped gto the keel this gave us a strong sturdy base and allowed us to drill accuratly at the correct point and angle.

IMG_2590

The 5/8" bolts thread into the the internal threads in the inserts. I left extra length so that I could taper the tops and help the bolts lead themselves through their holes
The 5/8″ bolts thread into the the internal threads in the inserts. I left extra length so that I could taper the tops and help the bolts lead themselves through their holes


Here the boat starts to rotate
Here the boat is upright with jack stands ready to be set but no blocks under the keel yet.

Once the hull is back over the ballast is moved back under the hull.
With careful measurments of the original balast and the new lofting the bolts are aligned with their holes pre drilled in the hull.


With the boat flipped the molds mostly came out so we could set some tempareaty cross braces before the shear clamps and deck beams go in.
The transom frame got vertical suports to help keep the planks flat as well as cleats vertically along the seams to help fasten them flush to eachother.
Here the sheer clamps and deck beams have been installed, but the interior is otherwise empty.

IMG_2733

interior starting to come together with some sole and ceiling work.

IMG_2731

SOle and ceiling continuing to develop.
The interior comes together quickly in preparation of the deck being installed


THe house deck beams get a half dovetail cut into the house carlin to avoid bolting the assembly together


The house is assembeled on the lofting floor to allow for varnishing in the warmth of the shop while the rest of the hull's interior is built and the deck is put down. Here the last few house beams are being fit and faired.The house is assembeled on the lofting floor to allow for varnishing in the warmth of the shop while the rest of the hull’s interior is built and the deck is put down. Here the last few house beams are being fit and faired.

DSC06339

DSC06344

In the inerest of stiffness of the hull the house top is built of two laminated layers. Here the inner thin cedar layer is installed and faired having already been painted on the inner surface.

house cedar faired

Here the outer ply surface has been vaccum pressed down to the cedar and screwed down to the house sides and beams. Here the vaccum is clamping down the scarf joiint in the middle of the house top.

DSC06357

THe house sides are of nicely matched mahogany with amazingly deep grain.
the first couple coats of sealer on the house sides starting to bring out the color.

DSC06372 DSC06375 DSC06376