Tag Archives: Herreshoff

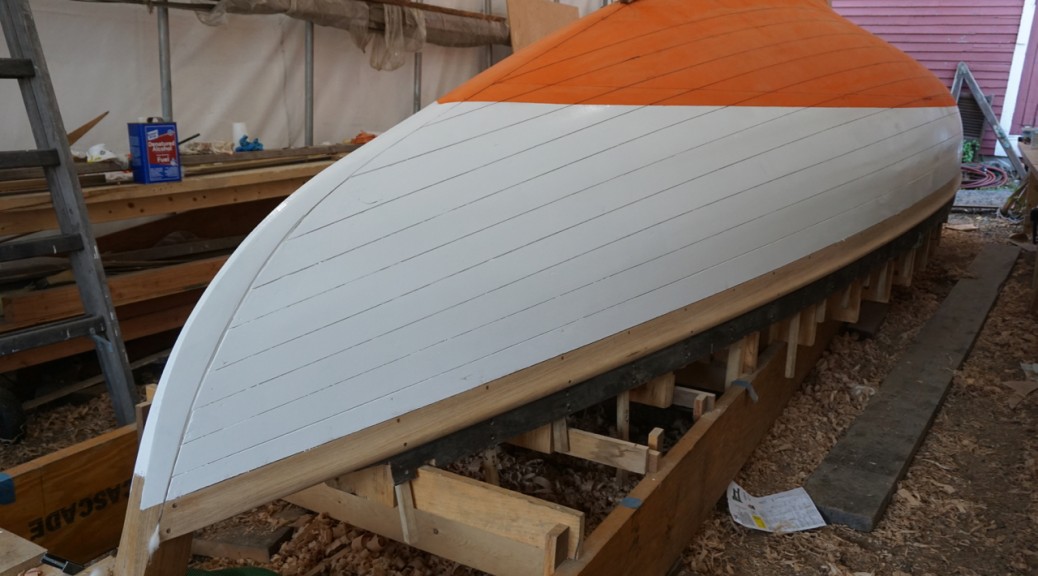
The first coats of primer are applied while the boat is upside down and more accessible.

Herreshoff S-class Arete #2

Dry fit mast staves to test joints and geometry. the 5 staves are glued up as one, then internal blocking fit adn finally the last three staves glued on top.
Fairing out the curve of the mast in preparation for glue up.
The upper deadwood is dry fit to the oak backer roughed opt to width to be final faired on the boat
without a 30' steam box the keel was steamed in a bag with steam generators piped in from both ends.
without a 30′ steam box the keel was steamed in a bag with steam generators piped in from both ends.
without a 30' steam box the keel was steamed in a bag with steam generators piped in from both ends.
without a 30′ steam box the keel was steamed in a bag with steam generators piped in from both ends.
without a 30' steam box the keel was steamed in a bag with steam generators piped in from both ends.
without a 30′ steam box the keel was steamed in a bag with steam generators piped in from both ends.
without a 30' steam box the keel was steamed in a bag with steam generators piped in from both ends.
without a 30′ steam box the keel was steamed in a bag with steam generators piped in from both ends.
Once clamed to position the bag is removed to allow the keel to cool and maintain the shape.

keel clamped down

All the clamps in the shop were used to get the mast glued up

mast glue up

Here the backbone assembly has been bolted together and the garboard installed. the battens define plank lines as I go down the hull. Since the boat is being rebuilt over molds I was able to template one side for planks on both sides. Heere the transom frame is also installed but left tall to be finished when installing the deck.
Here the forward section of keel and stem are bolted together and the garboard installed.
planking continues from the keel down until the planks run full length to the transom. At that point the sheer plank is installed and planking is completed from the bottom up as well to improve efficiency.
At this point the old planks are removed so we can continue to check fair of the frames that dont have molds.
the shape of the molded sheer profile is roughed out with a radial arm saw on an angle and a quarter round router bit on the top.
Sheer plank installed and starting to plank in both directions. Planks are let to run long past the transom and will be trimmed to fit the transom plank later. All surfaced between planks and frames are back primed to help preserve the wood and lower planks are bedded to keep water out from between the surfaces.

Planking continues

each plank is roughed to final thickness on the corners so when fairing we don't remove too little or too much material. The internal surfaces are shaped sanded and painted, but the outer are left mostly rough to be faired once the whole shape is developed.
each plank is roughed to final thickness on the corners so when fairing we don’t remove too little or too much material. The internal surfaces are shaped sanded and painted, but the outer are left mostly rough to be faired once the whole shape is developed.

DSC05768

the final plank is called the shutter plank. the mast can be seen glued up and hanging on the side of the tent.
the last plank is hard to clamp, so I used small boards tied off to the structure of the building jig and wedges to push the plank in as the fit was finalized and the plank fastened in. Any imperfections in the planking wer fixed at this point brefore fairing.
I made a transom template of the inner and outter faces fo the transom to trim the aft ends of the planking so it fit well before bringing in the solid 3/4" white oak transom planks.
I made a transom template of the inner and outter faces fo the transom to trim the aft ends of the planking so it fit well before bringing in the solid 3/4″ white oak transom planks.
Here the fit is getting close, some gap can still be seen near the sheer to the left.
Fairing the hull with a stiff long sanding board. Initially the hull is rough planed, then sanded smooth.
Once sanded fair the screws are all sunk to a final depth and bunged over.

DSC06254 bow bungs DSC06275

Once the bungs are trimmed off and sanded smooth I scribed in a waterline and drove cotton caulking into the seams.


Here the transom planks are being developed from the lofting. This drawing shows the internal framing and planking shapes.
Planks are quick to fit against the templates, but important to get good tight seams for a nice varnished surface later. Each seam is backed by a 3/4" oak cleat
Planks are quick to fit against the templates, but important to get good tight seams for a nice varnished surface later. Each seam is backed by a 3/4″ oak cleat

DSC06291 DSC06292

All the time fitting the template and lofting the curved raked transom pays off when you have a nice even steam defining the edge of the well radiused transom plank.
The first coats of primer are applied while the boat is upside down and more accessible.

DSC06312 DSC06316

this insert ended up threaded a little deep as the original bolt broke and needed to be bored out and the top of the hole ended up without nice clean full threads.
Here the threaded inseret is seen not quite at full depth. The top of the inseert ends up almost a full rodation below the top surface.
the magnetic drill is set on a scrap steel plate and clamped gto the keel this gave us a strong sturdy base and allowed us to drill accuratly at the correct point and angle.

IMG_2590

The 5/8" bolts thread into the the internal threads in the inserts. I left extra length so that I could taper the tops and help the bolts lead themselves through their holes
The 5/8″ bolts thread into the the internal threads in the inserts. I left extra length so that I could taper the tops and help the bolts lead themselves through their holes


Here the boat starts to rotate
Here the boat is upright with jack stands ready to be set but no blocks under the keel yet.

Once the hull is back over the ballast is moved back under the hull.
With careful measurments of the original balast and the new lofting the bolts are aligned with their holes pre drilled in the hull.


With the boat flipped the molds mostly came out so we could set some tempareaty cross braces before the shear clamps and deck beams go in.
The transom frame got vertical suports to help keep the planks flat as well as cleats vertically along the seams to help fasten them flush to eachother.
Here the sheer clamps and deck beams have been installed, but the interior is otherwise empty.

IMG_2733

interior starting to come together with some sole and ceiling work.

IMG_2731

SOle and ceiling continuing to develop.
The interior comes together quickly in preparation of the deck being installed


THe house deck beams get a half dovetail cut into the house carlin to avoid bolting the assembly together


The house is assembeled on the lofting floor to allow for varnishing in the warmth of the shop while the rest of the hull's interior is built and the deck is put down. Here the last few house beams are being fit and faired.The house is assembeled on the lofting floor to allow for varnishing in the warmth of the shop while the rest of the hull’s interior is built and the deck is put down. Here the last few house beams are being fit and faired.

DSC06339

DSC06344

In the inerest of stiffness of the hull the house top is built of two laminated layers. Here the inner thin cedar layer is installed and faired having already been painted on the inner surface.

house cedar faired

Here the outer ply surface has been vaccum pressed down to the cedar and screwed down to the house sides and beams. Here the vaccum is clamping down the scarf joiint in the middle of the house top.

DSC06357

THe house sides are of nicely matched mahogany with amazingly deep grain.
the first couple coats of sealer on the house sides starting to bring out the color.

DSC06372 DSC06375 DSC06376